
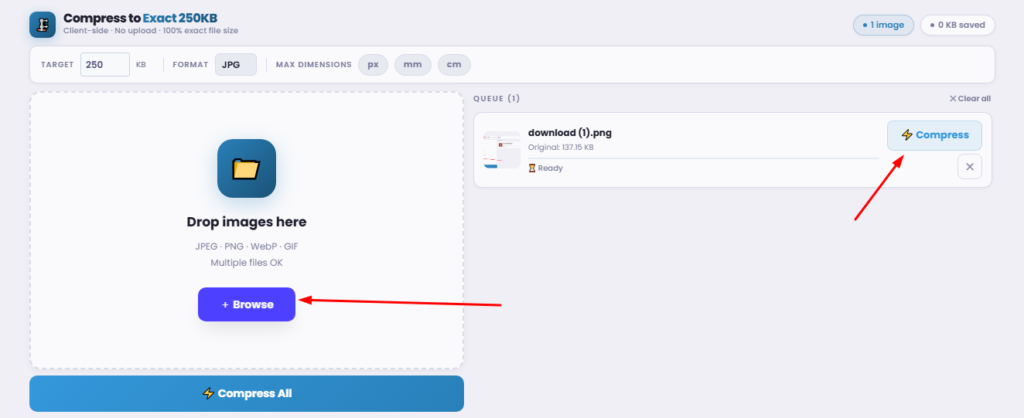
Multiple files OK
Add images using the panel on the left.
They'll appear here ready to compress.
Understanding 250 KB Photo Size Limitations
Have you ever spent hours meticulously filling out an online application, only to hit a brick wall at the very last step? You click “Submit,” but instead of a confirmation page, you are greeted by a glaring red error message: “File size exceeds the maximum limit.”
If you have experienced this frustration, you are definitely not alone. Whether you are applying for a digital visa, registering for a university entrance exam, or updating your professional profile on a job portal, navigating file size restrictions is a modern digital rite of passage. Among these restrictions, the 250 kb photo size is incredibly common.
But what exactly does this limit mean, and why is it the gold standard for so many platforms? More importantly, how can you alter your high-resolution smartphone selfies to meet these strict criteria without making them look blurry and pixelated?
In this comprehensive guide, we will break down everything you need to know about image sizing, compression, and the best practices to easily adapt your files for any digital portal.

Why Do We Need a Specific 250 KB Photo Size?
Before we dive into the technical “how-to,” it helps to understand why these limitations exist in the first place.
Modern smartphone cameras capture images in stunning high definition. A single portrait taken on a recent iPhone or Android device can easily exceed 5 to 10 Megabytes (MB). Now, imagine a government immigration portal receiving tens of thousands of these 10 MB files every single day. The server storage required would be astronomical, and the server costs would skyrocket.
By forcing applicants to use a 250 kb photo size, institutions ensure their databases run smoothly. Furthermore, smaller files are vital for optimizing images for fast loading speed. If a database is full of massive, uncompressed images, the system will lag, leading to website crashes during peak application seasons.
Finally, these restrictions often go hand-in-hand with strict passport photo size requirements. Authorities need images that are uniform, lightweight, and clear enough for facial recognition software, without bogging down the digital infrastructure.
Demystifying Image Size and Quality
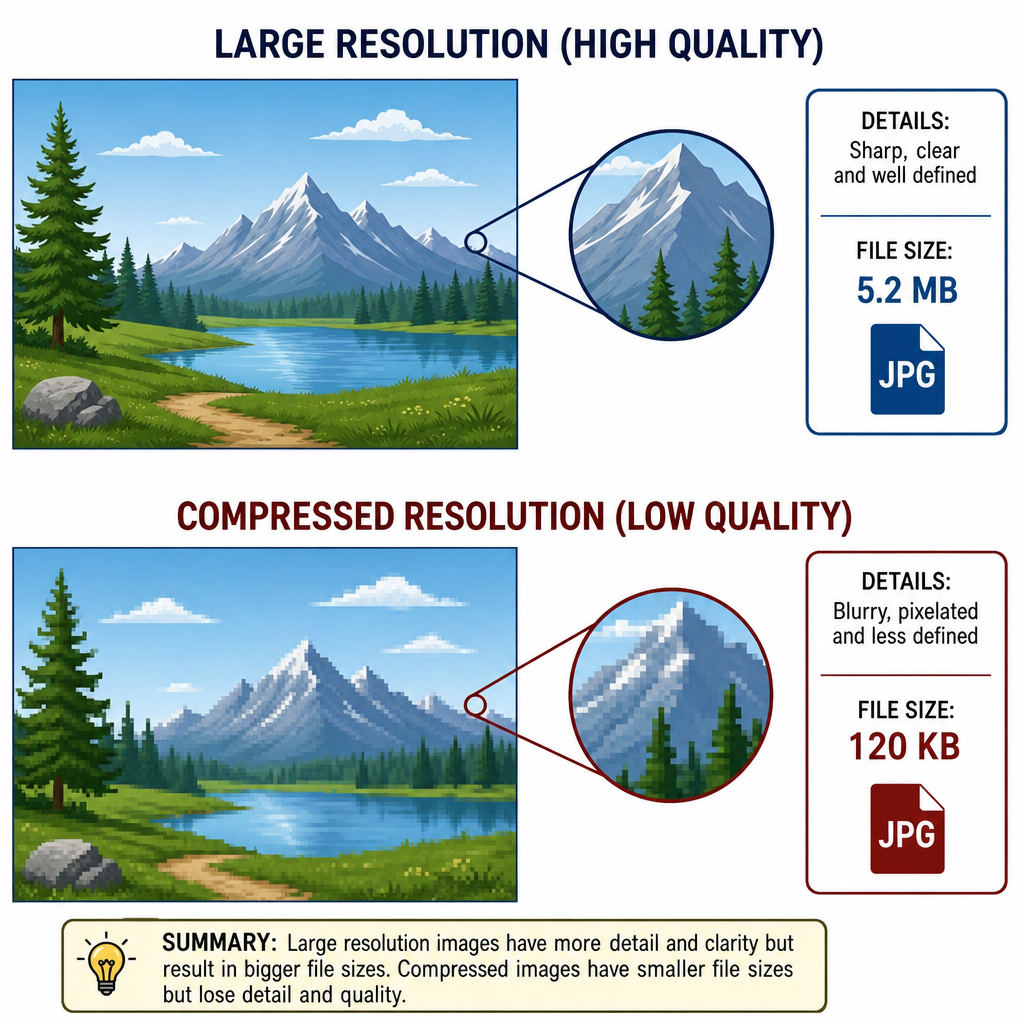
To successfully manipulate your photos, you need a basic understanding of how image data works. There is a delicate balance between how an image looks to the human eye and how much space it takes up on a hard drive.
The Impact of Resolution on File Size
Resolution refers to the number of pixels contained within an image. The more pixels an image has, the higher the resolution, and consequently, the larger the file size. The impact of resolution on file size is direct and exponential. If you cut an image’s dimensions (width and height) in half, you are actually reducing the total number of pixels by a factor of four, which drastically lowers the file size.
Lossy vs. Lossless Compression Explained
When you compress a file, you are essentially asking software to eliminate unnecessary data. But how it removes that data matters:
- Lossless Compression: This method reduces the file size without losing any original image data (common with PNG files). However, it usually cannot shrink files enough to meet tight web requirements.
- Lossy Compression: This method permanently discards data that the human eye can barely perceive. Having lossy vs lossless compression explained is crucial because, for web uploads, lossy compression (used by JPEG formats) is almost always the right choice. It allows you to massively shrink the file while keeping it visually acceptable.
Formats: Differences Between JPEG and WebP
When deciding on a file format, you might notice modern websites using WebP. Understanding the differences between JPEG and WebP can be helpful. WebP generally provides superior compression, creating smaller files with better quality than JPEGs.
However, many legacy application portals do not accept WebP files yet. For government and academic platforms, providing a standard JPG 250 kb file is universally accepted and remains the safest bet.
Step-by-Step: How to Achieve the Perfect 250 KB Image
Learning how to resize images for online application forms is a vital digital skill. Follow these structured steps to ensure your photo gets accepted on the first try.
Step 1: Crop Unnecessary Elements
Before touching compression sliders, look at your photo. Is there a lot of empty space above your head or around your shoulders? The most effective way to shrink a file is to literally cut away what you don’t need. When you crop and resize photo for portal upload, focus strictly on your face and upper shoulders, adhering to standard passport guidelines.
Step 2: Resize the Dimensions
Once cropped, you need to adjust the actual pixel dimensions. Most portals require a specific pixel count, such as 600×600 pixels. As you adjust the width or height, it is critical that you maintain the aspect ratio while resizing. If you disable the aspect ratio lock, your face will appear unnaturally stretched or squished, which guarantees an instant rejection from official portals.
Step 3: Compress the Image Data
If your file is still too large after cropping and resizing, you must compress the data. Your goal is to reduce the photo file size without losing quality visibly. You can do this by adjusting the “quality” slider found in most photo editing applications. Dropping the quality from 100% down to 80% or 75% will often drastically decrease jpg file size without making the photo look blurry.
Selecting the Best Tools to Resize and Compress
You don’t need expensive professional software to compress image to 250 kb. There are countless free tools designed specifically for this purpose.
Dedicated Online Converters
If you just want a quick fix without downloading software, a dedicated web tool is your best friend. A good convert mb to kb image converter will allow you to upload your massive smartphone photo and spit out a lightweight version in seconds.
For maximum convenience, look for a specialized JPG 250 kb converter. These tools take the guesswork out of the process. You simply set your target size, and the image compressor to 250kb will automatically adjust the settings under the hood to ensure the final output hits the mark.
Tools for Specific Needs
- Exact Sizing: Sometimes, platforms are highly specific, requiring files between 200 KB and 250 KB. In these cases, you need a tool that allows you to compress an image to a specific KB rather than just applying a generic “medium” or “low” quality setting.
- Multiple Files: If you are a photographer, HR manager, or teacher uploading photos for a whole classroom, doing this one by one is tedious. Utilizing a batch photo resizer online will allow you to process dozens of images simultaneously, saving hours of manual labor.
- Web Optimization: If you are a web developer or blogger looking to speed up your site, running your visual assets through the best image optimizer for web (like TinyPNG or ShortPixel) will ensure you compress jpeg to 250kb or less without sacrificing visual fidelity.
Pro Tips for Mobile Users
Most of us take our ID photos on our smartphones. However, mobile operating systems deliberately hide file sizes to keep the user experience simple.
How to Check Image Size on Your Phone
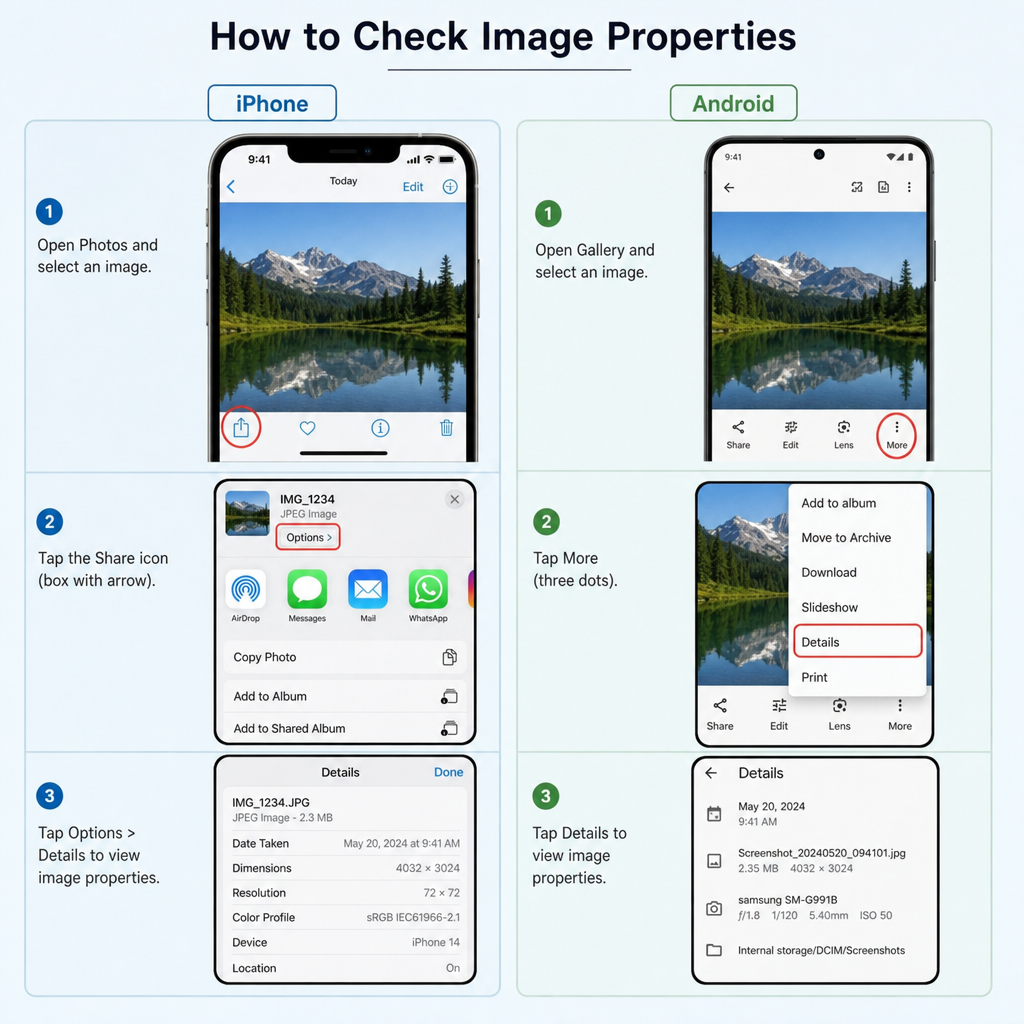
Before you try to resize image to 250 KB, you need to know your starting point. Here is how to check image properties on mobile:
- On iPhone (iOS): Open the Photos app, select your image, and swipe up (or tap the “i” info icon at the bottom). You will clearly see the file size (e.g., 3.2 MB) and the dimensions.
- On Android: Open your gallery app, select the photo, and tap the three vertical dots (More options) in the corner. Select “Details” or “Properties” to view the exact file size.
Compressing Directly from Your Phone
Native smartphone gallery apps are great for cropping, but they are notoriously bad at file size compression. You usually cannot tell your phone to reduce image size to 250 KB natively.
To bypass this, open your mobile web browser and search for a tool to compress a JPG to 250 KB. Upload your photo from your phone’s gallery into the browser tool, process it, and save the new version to your device. Be sure to check your phone’s “Downloads” folder to find the newly optimized file, as it will likely not save automatically to your primary camera roll.
Conclusion: Keep It Simple and Compliant
Navigating digital bureaucracy doesn’t have to be a headache. Understanding the 250 kb photo size requirement is simply about recognizing the balance between system efficiency and image clarity.
By remembering to crop out the background, strictly maintaining your aspect ratio, and utilizing a reliable tool to compress to 250 kb, you can conquer any online application form with ease. The next time you are faced with a stubborn file upload portal, you’ll know exactly how to decrease JPG file size quickly, efficiently, and without compromising the professional look of your photo.