
Multiple files OK
Add images using the panel on the left.
They'll appear here ready to compress.
How to Compress Image to 90KB Efficiently
Compressing images to 90KB is crucial for digital efficiency. It enhances website speed and user experience.
Large images can slow down page loading times. This can frustrate users and affect SEO rankings.
By reducing image size, you can improve performance. This is essential for photographers, web developers, and marketers.
Various tools can help you achieve this without losing quality. Understanding the right techniques is key.
This guide will walk you through the process. You’ll learn about the best tools and methods available.
Optimize your images today and see the difference it makes. Let’s dive into the world of image compression.
Why Compress Images to 90KB?
Reducing image size to 90KB is beneficial for several reasons. It contributes to faster web page load times. This is important for keeping your audience engaged.
Optimized images also improve SEO. Search engines favor websites that load quickly. Better SEO means more visibility and potential traffic.
For users with slower internet connections, smaller images are crucial. They ensure everyone can access your content smoothly. This inclusivity is often overlooked.
Additionally, many platforms and digital services have file size limits for uploads. By compressing images to 90KB, you can meet these requirements easily. This ensures your content is ready for any platform.
The benefits are numerous, including:
- Improved user experience
- Enhanced SEO performance
- Compliance with platform limitations

Lastly, compressing images saves storage space on your servers. This efficiency can lead to reduced costs and maintenance headaches. Optimize your images and enjoy these significant advantages.
Understanding Image Compression: Lossy vs. Lossless
Image compression comes in two main types: lossy and lossless. Each has its distinct benefits and drawbacks. Understanding these can aid in making informed decisions.
Lossy compression reduces file size by removing some data. This can slightly affect image quality. However, the reduction in size is significant. Formats like JPEG use lossy compression, making them suitable for web use.
In contrast, lossless compression retains all data. The quality remains unchanged, but the reduction in size is less dramatic. PNG is a popular format using lossless compression. It’s ideal for images where detail is crucial.
Choosing between the two depends on specific needs. Consider the following:
- Quality retention vs. size reduction
- Format suitability for use cases
- Impact on detail and sharpness

In many cases, striking a balance is crucial. For web use, lossy is often preferred for size efficiency, while lossless is chosen for high-quality demands.
Choosing the Right Image Format for Compression
Selecting the appropriate image format is key to successful compression. Each format offers unique advantages and limitations. Understanding these can optimize results significantly.
JPEG is a widely used format, excellent for compressing photos. It supports lossy compression, which reduces size effectively. This makes it ideal for web pages and social media.
On the other hand, PNG is perfect for images requiring transparency and detailed quality. It employs lossless compression, preserving image details. This format is suitable for logos and graphics.
Consider the following factors when choosing a format:
- Image type (photo, graphic, etc.)
- Need for transparency
- Desired quality level
Ultimately, the choice depends on the intended use and quality priorities. Balancing these aspects ensures optimal results for any project.
Top Tools to Compress Image to 90KB
Numerous tools can efficiently compress images to 90KB. These solutions cater to various needs, offering a blend of ease and advanced options.
TinyPNG is a popular choice for JPEG and PNG formats. It uses smart lossy compression to reduce file size significantly while maintaining quality. It’s user-friendly, making it suitable for beginners.
Another excellent option is JPEG Optimizer, which specializes in optimizing JPEG images. It allows you to adjust the compression level for the desired balance between quality and size.
ImageOptim is favored by professionals for batch processing and removing unnecessary metadata. It’s a free tool offering drag-and-drop simplicity, ideal for large projects.
Some tools to consider:
- TinyPNG
- JPEG Optimizer
- ImageOptim
Online tools like Optimizilla provide versatility and support multiple formats. Their intuitive interfaces simplify the compression process. Advanced users might appreciate the customization options available in these tools.
Choosing the right tool can streamline your workflow. Exploring these options can lead to efficient compression tailored to your specific needs, enhancing both speed and visual quality.
Step-by-Step Guide: Compress Image to 90KB Online
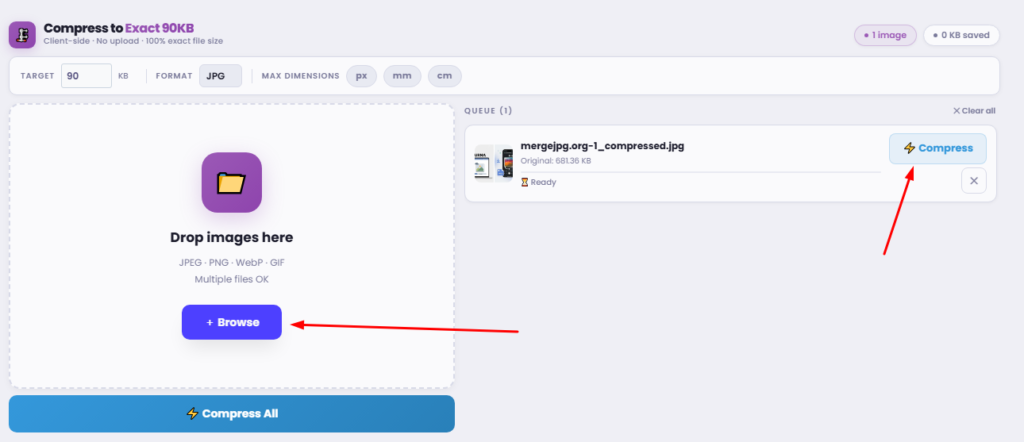
Compressing images online is both easy and effective. You can use a range of tools with just a few clicks. Let’s walk through the steps required to compress an image to 90KB.
First, choose an online image compressor. TinyPNG is a popular choice for its simplicity. Navigate to the tool’s website in your web browser.
Begin by uploading your image. Most online tools support drag-and-drop functionality. After selecting your image, drop it in the specified upload area.
Next, watch the tool perform its magic. The software processes your image, optimizing and reducing the file size. This process typically takes just a few seconds.
Once processing is complete, you can preview the compressed image. Ensure the quality meets your expectations. Some tools allow side-by-side comparisons with the original.
Finally, download the compressed image. Most tools provide a simple download link for easy access. Save the image to your preferred location on your device.
Remember, image quality might vary with compression levels. Always check if further adjustments are necessary before using the final file.
By following these steps, you can efficiently compress your images for web use or storage, making your workflow smoother and more effective.
Advanced Settings and Tips for Better Results
To achieve the best quality, explore advanced settings. Different tools offer various options. These settings can help fine-tune your compression results.
First, consider adjusting the compression ratio. Some tools let you control the balance between file size and quality. Experiment with these settings to find the best compromise.
Another useful tip is to adjust the image resolution. Lowering the resolution can further reduce the file size. This is especially helpful if the image is for web display.
Check if your tool offers color settings. Reducing the color depth can save additional space. However, this might affect image vibrancy.
For advanced users, some tools offer script or plugin options. These features automate compression, saving time during batch processing.
Finally, always preview your images before finalizing. This ensures the quality meets your needs, avoiding unpleasant surprises in the end.
Batch Compression: Save Time with Multiple Images
When dealing with many images, batch compression is a lifesaver. This method allows you to compress multiple files at once, saving significant time. Many tools support this feature, making it easy to streamline your workflow.
To use batch compression, simply select your images and upload them. Most tools have a drag-and-drop interface for simplicity. Once uploaded, the tool will process all images simultaneously, ensuring uniform quality and file size reduction.
 by ONUR KURT (https://unsplash.com/@bykurt)
The advantages of batch processing include:
- Time efficiency and convenience.
- Consistent image quality across all files.
- Reduced workload by automating repetitive tasks.
Consider using a batch compression tool for any large image sets. This approach is both practical and efficient, freeing you up to focus on other tasks.
Compress JPEG to 90KB: Special Considerations
JPEG files are popular due to their balance of quality and file size. However, compressing them to precisely 90KB requires some finesse. This is because JPEG compression relies on altering the image data, which can affect quality.
When compressing JPEGs, it’s essential to pay attention to quality settings. Reducing the quality slightly can significantly lower the file size.
 by Imam Fadly (https://unsplash.com/@haiiimam)
Here are special considerations for JPEG compression:
- Use quality settings wisely to retain clarity.
- Be aware of color depth reductions.
- Ensure artifacts do not appear in the compressed image.
Careful adjustment of these settings helps achieve the desired size without a noticeable decline in image quality. Test different settings to find the right balance for your specific needs.
Resize Image to 90KB: Adjusting Dimensions and Quality
Resizing images can be an effective way to reduce file size. By adjusting the dimensions, you can compress the image to 90KB without significant quality loss.
Start by determining the smallest dimensions that meet your needs. Smaller images naturally have less data, resulting in smaller file sizes.
 by The Creativv (https://unsplash.com/@thecreativv)
Consider the following when resizing images:
- Choose appropriate dimensions for your project.
- Balance between size reduction and quality retention.
- Use high-quality resizing algorithms.
Proper resizing not only compresses the image but also ensures clarity. By focusing on dimensions, you can often maintain the essence of the image while achieving the desired file size.
Common Issues and How to Fix Them
Compressing images can sometimes lead to unexpected problems. One common issue is a loss of image quality. Pay attention to blurriness or pixelation.
To address this, consider these solutions:
- Use high-quality compression tools.
- Balance between compression levels and quality.
- Check the image settings before finalizing.
Another issue is incorrect file formats. Always ensure compatibility with intended platforms. By troubleshooting and applying best practices, you can maintain both size and quality in your compressed images.
Best Practices for Maintaining Image Quality
Achieving the perfect balance between image size and quality is crucial. Here are some best practices to help maintain the quality of your images after compression.
First, always start with a high-resolution image. This ensures the compressed version maintains clarity and detail. Compare original and compressed images side by side to check for quality loss.
Consider the following tips:
- Use lossless compression when possible.
- Adjust image dimensions before compressing.
- Test different tools for optimal results.
By following these practices, you can compress images while keeping their quality intact, making them suitable for online use and storage.
Frequently Asked Questions
Here, we address some common questions about image compression. Understanding these can help streamline your workflow.
What is the difference between lossy and lossless compression?
Lossy compression reduces file size by discarding some data, possibly affecting quality. Lossless compression retains all original data, preserving quality.
Can I compress images directly on my smartphone?
Yes, many mobile apps allow for efficient image compression. They are convenient for on-the-go use.
How do I choose the right compression tool?
Consider factors like ease of use, available features, and support for your preferred image formats.
Key considerations:
- Tool cost (free or paid)
- Batch processing capability
- Format compatibility
These insights should help you navigate common challenges in image compression.
Conclusion: Optimize Your Workflow with Image Compression
Image compression is a vital part of digital optimization. By reducing file sizes, you enhance loading speeds and improve user experience.
Incorporating regular compression into your workflow ensures consistent performance. Utilizing the right tools simplifies this process, benefiting your digital projects. Make image compression a standard practice to maximize efficiency in your digital endeavors.