
How to Add Signature in Word
In today’s fast-paced, paperless professional landscape, printing out a document just to sign it and scan it back is incredibly inefficient. Whether you are dealing with a contract, an offer letter, or a simple authorization form, knowing how to sign a Word document electronically is a must-have skill.
If you are wondering how to add signature in Word, you have come to the right place. This comprehensive guide will walk you through everything from inserting a simple handwritten image to applying a highly secure, cryptographic digital certificate. By the end of this article, you will know exactly how to insert signature in word using multiple methods, ensuring your documents look professional and legally sound.

Digital Signature vs Electronic Signature Differences
Before we dive into the technical steps of how to add signature in MS Word, it is crucial to understand the difference between a digital signature vs electronic signature. People often use these terms interchangeably, but they represent two distinct concepts:
- Electronic Signature (E-Signature): An electronic signature in Word is essentially a visual representation of your signature. It can be a typed name, an uploaded image of your handwritten signature, or a drawn signature. Learning how to create an e-signature in Word is quick and easy, but it relies on basic intent rather than high-level security.
- Digital Signature: A digital signature in Word uses encryption and digital certificates to authenticate the identity of the signer. It guarantees that the document has not been tampered with since it was signed.
This brings up a common question: is a digital signature legally binding in Word? Yes, when backed by a recognized digital certificate, a digital signature Word document holds legal weight comparable to a physical signature in many jurisdictions worldwide.
Now, let’s explore the exact steps to help you master every MS Word signature method.
Method 1: Inserting Scanned Handwritten Signature Image
For those who want a personalized touch, inserting scanned handwritten signature image files is a classic method. It gives your document the exact look of your physical pen-and-ink signature.
Step 1: Capture and Prepare Your Signature
- Sign your name clearly on a blank piece of white paper.
- Take a high-resolution photo or scan the page.
- Transfer the image to your computer. You may need to scan and crop the signature for professional documents so that only the signature itself remains, eliminating unnecessary white space.
Step 2: Insert the Image into Word
- Open your document and place your cursor where you want to add a signature to a Word document.
- Go to the Insert tab, click Pictures, and choose This Device.
- Select your cropped signature image.
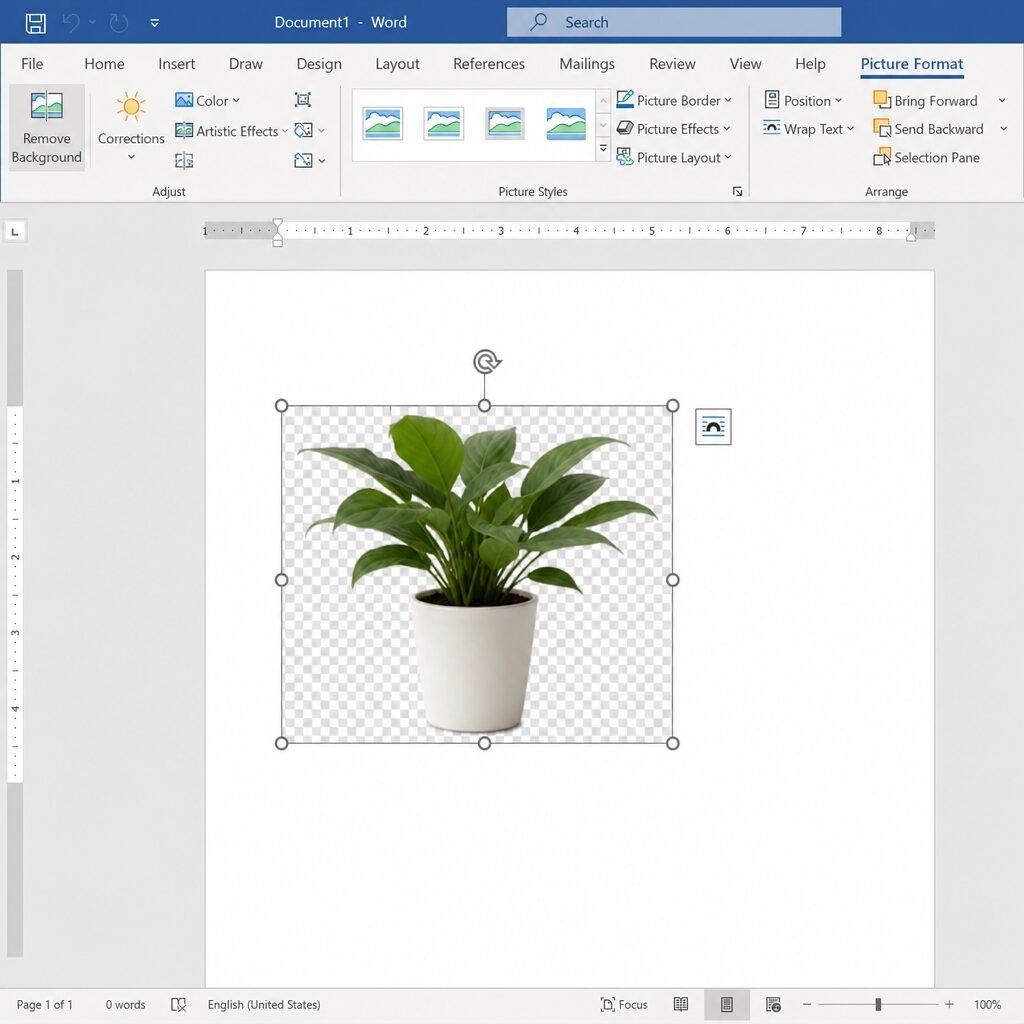
Step 3: Removing White Background from Signature in Word
Sometimes, the paper’s background clashes with your document. Word has a built-in tool for this:
- Click on your inserted signature image.
- Go to the Picture Format tab and click Remove Background.
- Word will highlight the background in magenta. Use the “Mark Areas to Keep” or “Mark Areas to Remove” tools to refine it, then click Keep Changes.
Step 4: Saving Reusable Signatures Using Quick Parts
If you frequently need to sign Word files, you don’t want to repeat this process every time. Saving reusable signatures using Quick Parts is a game-changer:
- Type your name, title, and contact info directly below your inserted signature image.
- Highlight both the image and the text.
- Go to Insert > Quick Parts > Save Selection to Quick Part Gallery.
- Name it “My Signature.” The next time you need to figure out how to insert a sign in Word, just go to Quick Parts and select your saved template!
Method 2: How to Draw a Signature in Word
If you are using a touchscreen device, a tablet, or simply have a steady hand with a mouse, you can directly draw a signature in Word. This is often the fastest way to figure out how to make a signature in Word on the fly.
- Open your document and navigate to the Draw tab on the top ribbon. (If you don’t see it, right-click the ribbon, select Customize the Ribbon, and check the “Draw” box).
- Select a pen tool from the menu. You can choose the color and thickness.
- Use your mouse, stylus, or finger to draw your signature directly onto the page.
- Once done, click the Select tool (or press Esc) to exit drawing mode. You can now resize and drag the signature exactly where it needs to be. This is a brilliant, straightforward way to solve how to add a sign in Word.

Method 3: How to Create a Signature Line in Microsoft Word
Sometimes, you aren’t the one signing; you need to prepare a document for someone else to sign. Adding a formal signature line in MS Word provides a clear, designated space for the signer.
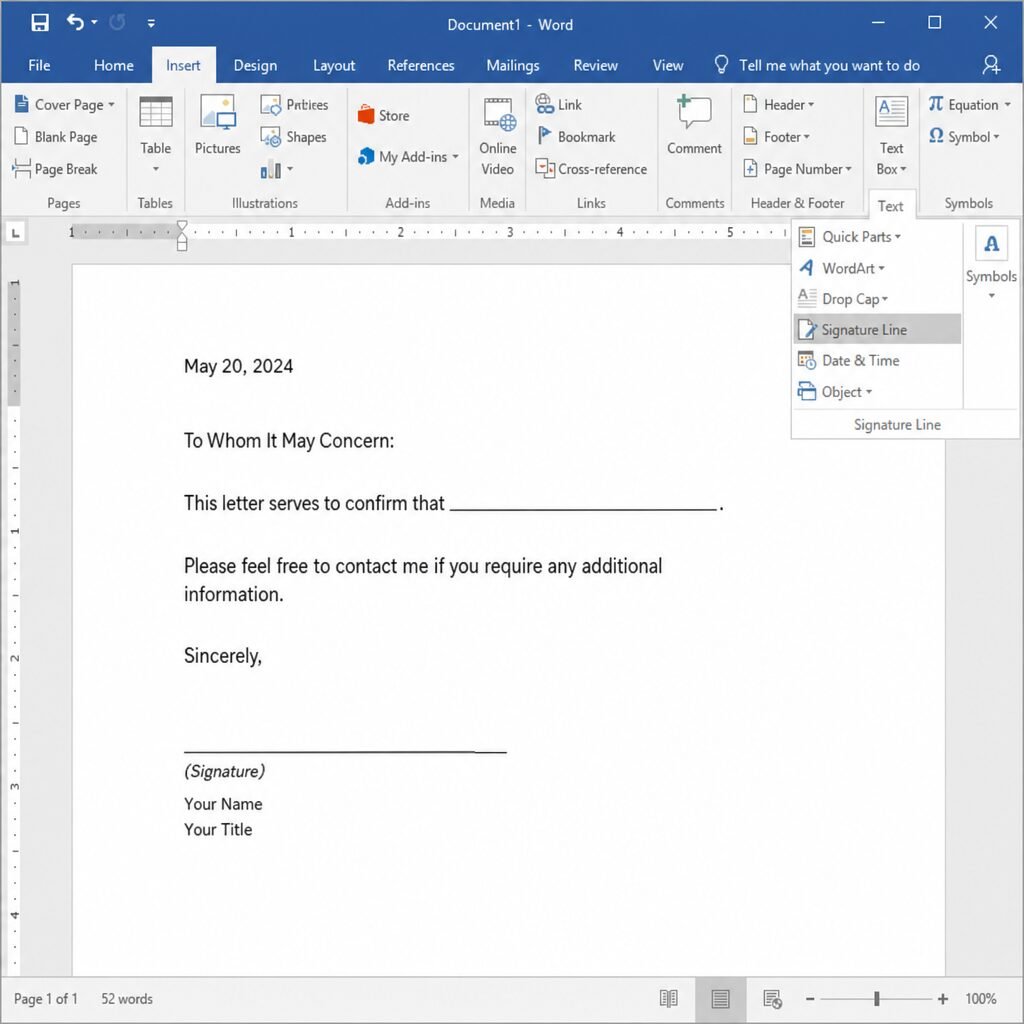
Adding the Signature Line
- Place your cursor where the signature should go.
- Go to the Insert tab. In the “Text” group, click on Signature Line (or Microsoft Office Signature Line).
- A dialog box will appear. Here, you can type the signer’s name, title, and email address.
- You also have the option of customizing signature line instructions for signers (e.g., “Please sign and return by Friday”).
- Click OK. A clean, professional signature line will appear, complete with an “X” indicating where to sign.
Troubleshooting Signature Line Not Appearing
If you are troubleshooting a signature line not appearing, ensure that your document is saved in the modern .docx format rather than the older .doc format, as compatibility mode can sometimes hide or disable newer visual features.
Method 4: How to Add a Digital Signature in Word (Certificate-Based)
If you are handling sensitive legal or financial contracts, learning how to create a digital signature in Word using cryptography is essential. To do this, you need a digital certificate, which you can obtain from a trusted Certificate Authority (CA) like GlobalSign or IdenTrust.
Inserting a Digital Certificate into Word
Once you have your certificate installed on your computer, here is how to digitally sign a Word document:
- Double-click the formal signature line you created using the method above.
- A “Sign” dialog box will appear.
- If you want to use an image of your handwritten signature alongside the cryptographic security, click Select Image and choose your file.
- Alternatively, just type your name next to the “X”.
- At the bottom of the window, Word will display the digital certificate it plans to use. (This is the core of inserting a digital certificate into Word.
- Click Sign.
The document is now cryptographically sealed. If anyone tries to edit the document afterward, the signature will be invalidated, alerting everyone that the file was tampered with. This answers the question of how to put a digital signature in Word securely.
Adding an Invisible Digital Signature for Authentication
Sometimes you want to secure a document without putting a visible signature line on the page. In this case, adding an invisible digital signature for authentication is the way to go:
- Click the File tab.
- Go to Info > Protect Document.
- Select Add a Digital Signature.
- Choose your commitment type (e.g., “Created and approved this document”), select your certificate, and click Sign.
Understanding how to make a digital signature in Word both visibly and invisibly ensures you have total control over document security.
Alternative Ways to Sign: Mobile, Mac, and Add-ins
The modern workforce is highly mobile. Knowing how to add signature in Word isn’t restricted to a Windows desktop.
How to Sign a DOCX File on Mac
If you are wondering how to sign a docx file on Mac, the process is remarkably similar. You can still use the Insert > Pictures method to add a scanned image. Alternatively, Mac users often utilize the Trackpad to sign: you can sign an image in the Mac Preview app, save it, and then insert it into Word. Finding out how to insert digital signature in word on Mac also works via the “Insert > Signature Line” feature, provided you have a valid keychain certificate.
How to Draw a Signature on Word Mobile App
If you are on the go, knowing how to draw a signature on Word mobile app (available for iOS and Android) is a lifesaver:
- Open the document in the Word mobile app.
- Tap the Edit icon (the pencil).
- Switch the menu to the Draw tab.
- Select the pen tool and draw your signature on your screen with your finger or stylus. It is the easiest way to figure out how to esign a word document from your phone!
Best Electronic Signature Add-ins for Office 365
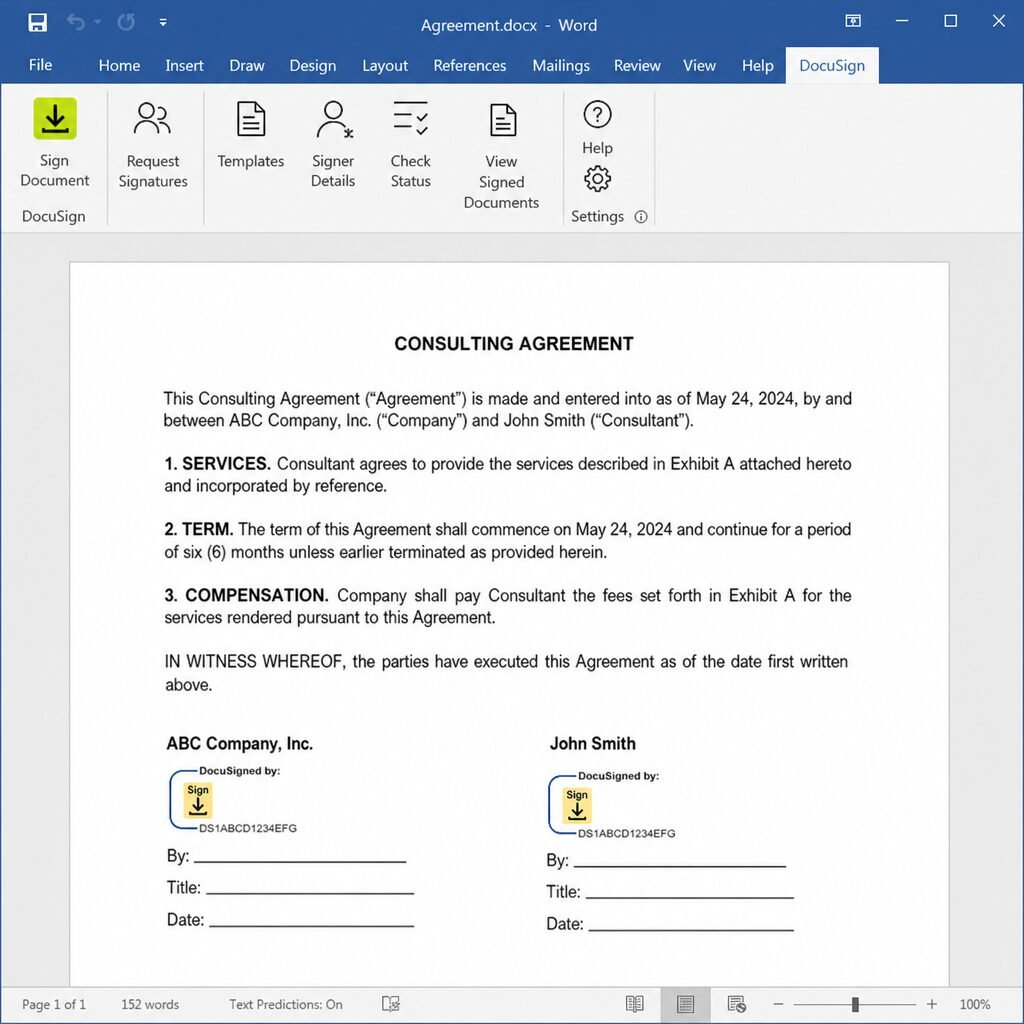
For businesses that process high volumes of contracts, using native Word tools might not be enough. In these cases, integrating third-party tools is highly recommended. The best electronic signature add-ins for Office 365 include industry leaders like DocuSign, Adobe Acrobat Sign, and HelloSign.
By going to Insert > Get Add-ins, you can search for and install these plugins. They allow you to route a signature in word document directly to clients, track when they open it, and collect legally binding e-signatures seamlessly. This completely streamlines how to electronically sign a word document for remote teams.
Finalizing: Converting Word Document to Signed PDF
After you figure out how to add digital signature in word or place your handwritten e-signature, it is highly recommended to lock the formatting before emailing it to others.
Converting word document to signed PDF ensures that your formatting stays intact regardless of the device the recipient uses to open it. Simply go to File > Save As and select PDF from the dropdown menu. Just note that if you used a cryptographic digital certificate, you should export it carefully to ensure the certificate data remains embedded, or rely on PDF-specific signing tools (like Adobe) post-conversion.
Conclusion
Transitioning to a paperless workflow doesn’t have to be complicated. Whether you simply needed to know how to add signature in word for a quick informal letter, or you needed to learn how to insert digital signature in word to secure a highly sensitive corporate contract, Microsoft Word offers a robust suite of tools to meet your needs.
From inserting scanned handwritten signature image files and utilizing Quick Parts, to setting up formal signature lines and relying on advanced cryptographic certificates, you are now fully equipped to handle any signing scenario. Practice creating an e signature in word today, and take a massive step toward a more efficient, professional, and digital-first workflow.